Friday, October 12, 2012

How to Extend Your Outdoor Living Season


Now that Summer is officially over, the days of pool parties, BBQs and entertaining in your outdoor living space is over, right? No! The cool, crisp days of Autumn are actually ideal for having outdoor cook-outs, tailgating for the Game on TV, hanging out around the fireplace and hosting Holiday themed gatherings!

A few tips for extending the use of your Outdoor Living spaces this Fall: 

Design your Outdoor Living Space for versatility 


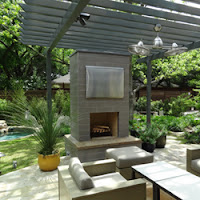
Isokern Outdoor Fireplace
By adding comfortable seating, kitchen elements and, if you have a covered area, a TV, you’ll be able to use your space for multiple activities! 
 

Keep comfort in mind

 
In addition to comfortable seating, add an Outdoor Fireplace or other fire element for keeping warm after the sun goes down.  Additional fun benefits of a fire element include roasting marshmallows, a place to mount your TV for watching the game or a movie and a providing a central gathering place for adults and kids alike.

Fire up your Wood Burning Oven or Grill


ISO'ven Wood Burning Pizza Oven
Your outdoor kitchen elements are not just for cooking up hamburgers and hotdogs in the Summer months – they can be used year round for delicious treats!  In addition to traditional grill fare, a wood burning oven can be especially fun when you have a get-together or party – it can be used for cooking personal pizzas, short ribs, bread and a host of treats and snacks! There are several sources that can be found online for Wood Burning Oven recipes.

Gardens

 
Provide the fresh veggies and herbs for your outdoor kitchen cooking from your own gardens!  Consider growing a couple of Pumpkins for carving or décor instead of using store-bought.  Raised garden beds can provide additional seating transform your back yard.
 
If you haven’t created your Outdoor Living space yet, then now is the time to start planning! Decide what your primary focal point (outdoor fireplace, kitchen, wood fired oven, TV or Seating area) and goal will be (cooking, entertaining, family gatherings, tailgating) and go from there.  There is a huge source online for design tips, photo galleries and sites such as Pinterest to fuel your design juices and helpful articles. 
 
Photo Credits:
Isokern Outdoor Fireplace - Ellen Grasso and Sons in Dallas, TX.
ISO'ven Wood Burning Pizza Oven - Creative Visions, NJ

By: Georgia Fishel

Wednesday, October 3, 2012

How do I Repair my Fireplace's Fire Brick?


Along with any part of your home, your fireplace requires maintenance to ensure your family’s safety during its use.  There are three main components to your fireplace; the firebox itself (Modular, Masonry or Metal), the damper / chimney system and the fire brick liner. Fire bricks absorb heat, providing a buffer between the fire and the firebox, maintaining a high temperature and preventing damage to the wall behind a fireplace.  Fire brick mortar and/or fire bricks can become damaged after years of use which can cause a fire brick to fall out or crack.  A cracked or damaged fire brick can be a potential fire hazard and should be repaired or replaced before using the fireplace again.

Repairing Cracked Fire Brick


Supplies Needed:
  • Water
  • Detergent
  • Scourer
  • Fire Cement
  • Gloves
  • Trowel
Directions (for Individually applied Fire Brick):

  1. Clean any soot, grease or dust from the fire brick that is to be repaired – allow brick to dry before beginning the repair.
  2. Apply fire cement to the area that is being repaired, using the trowel.  If the brick has broken into more than one piece, apply a layer of cement along one edge of the break and push the pieces firmly back together.  Wipe any excess cement from the brick.  If repairing a crack, work the cement well into the area, removing any excess.
  3. Apply heat to the fire brick, gradually increasing the temperature over a three to four hour period.
  4. Allow the brick to cool and check for further cracks.  If additional cracks are found, repeat steps 1-3. 

Replacing Damaged Fire brick

 
Supplies Needed:
  • Carbide-Tipped Scoring Tool meant for cutting tile backer board
  • Metal Jointer
  • Brick Trowel
  • Tuck-Pointing Trowel (narrow enough to fit in the brick joints)
  • Dry-Mix Refractory Mortar
  • Water
  • Paintbrush

Directions (for Individually applied Fire Brick):

  1. Scrape out the loose mortar.  Rake out the joint with the scoring tool – start gently, probing for areas that are loose.  Dig out the deteriorated mortar until the joint is about ½ to ¾ inches deep and the brick surface on both sides of the joint are mortar free.
  2. Brush the joint.  Use an old paintbrush and vacuum to sweep the joints clean.  Brush water onto the joints and brick faces (mortar doesn’t stick to bone-dry brick well).
  3. Pack the mortar.  Mix a small batch of mortar according the mortar directions and apply to the brick in line with the joint – pack into the joint with a tuck-pointing trowel.  Pack about halfway full, then press firmly as you pull the pointing trowel (handle first) along the joint until joint is filled.
  4. Clean up by scraping the excess mortar off of the brick faces and then wipe immediately with a damp sponge.
  5. Let the mortar dry completely for several days – after completely dry, rough up with a metal chisel if desired so it matches the surrounding mortar.  

For factory built fireplaces with installed fire brick panels, contact the Fireplace Manufacturer for instructions on replacement/repair.

NOTE: Though each individual mason may have their own technique because of geographic conditions or training, these are some general procedures for repairing cracked fire brick.

Sources: ehow.com, This Old House
 
By: Georgia Fishel